Car Detailing Before and After Reels (the Close-Up and the Full Reveal)
Detailing has two different pairs, not one, and reflections turn a paint job into a mirror. A method for shooting both without the detailer ending up in their own photo.
You have just finished correcting a panel, the swirl marks are gone, the paint is throwing a sharper reflection than it was an hour ago, and you have a phone in your hand before the next job starts. This is where most detailing content goes wrong, not because the work is not good enough to post, but because it is trying to be one photograph when it needs to be two.
Detailing produces two genuinely different pairs on the same job, and the trade mixes them up more than any other on this site.
Two pairs, not one
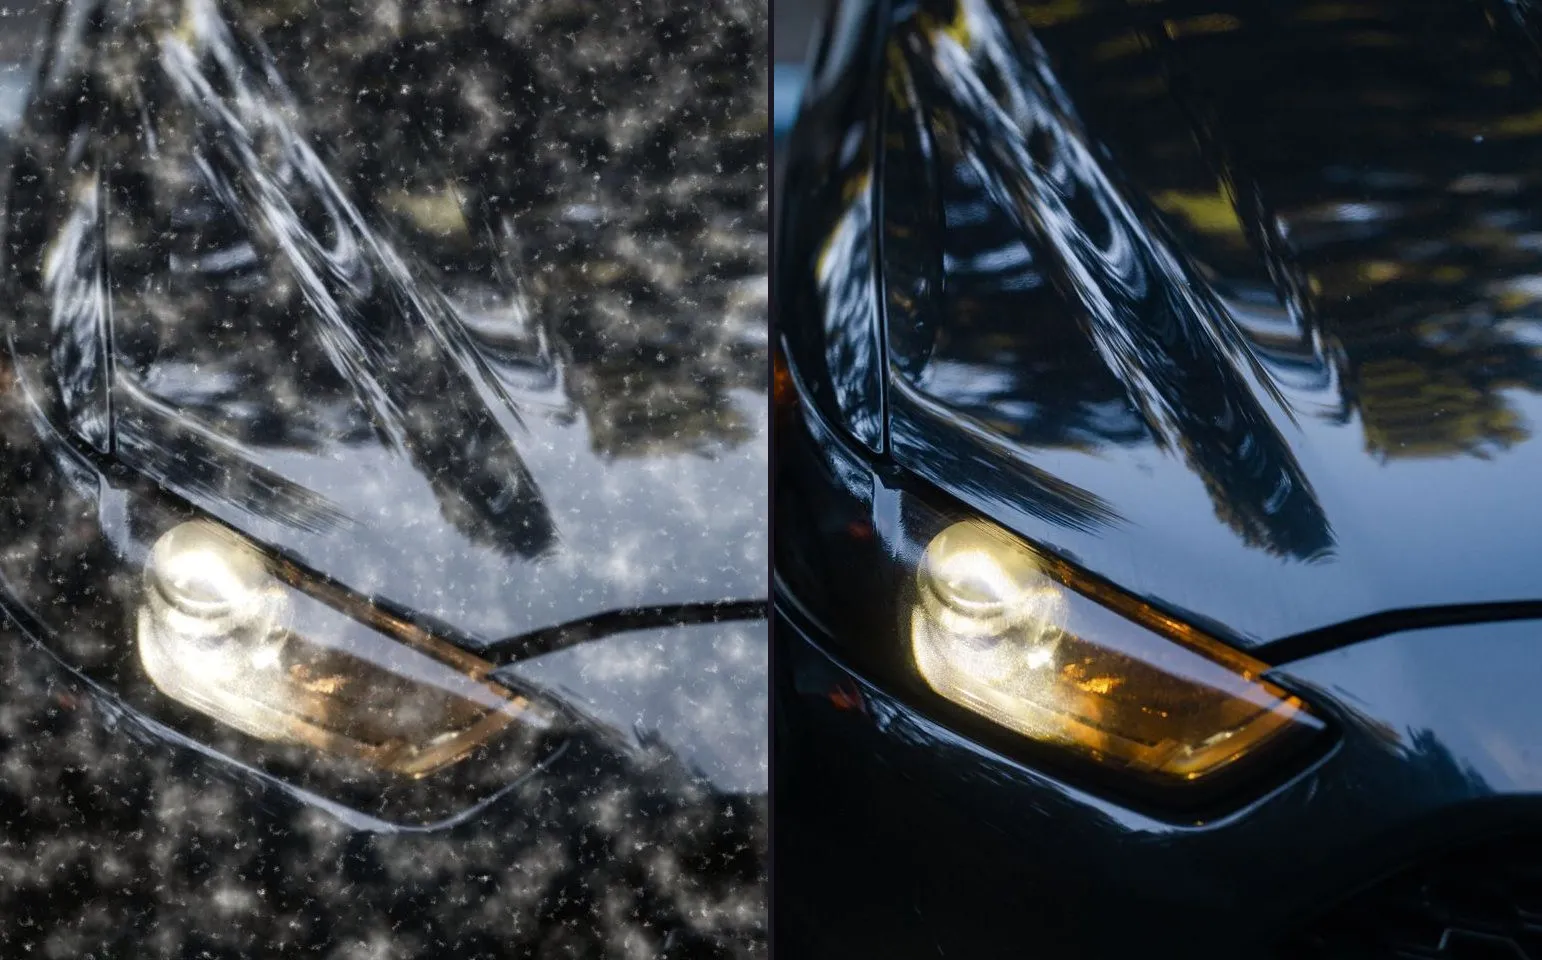
The first pair is the panel close-up. It is a tight shot of one section, a bonnet, a door skin, a wheel arch, taken to prove that correction actually happened to the paint. It is for the viewer who knows what swirl marks look like and wants to see them gone, close enough to check your work.
The second pair is the full-car reveal. It is a wider shot of the whole vehicle, taken to sell the booking to someone who has never met you and is deciding in about two seconds whether to keep scrolling. It does not need to prove anything technical. It needs to look like a result somebody would pay for.
These are not the same photograph cropped two ways. The panel close-up wants distance held tight and the reflection controlled precisely, because a reflection is most of what a macro paint shot actually shows. The full reveal wants the whole car in frame, doors shut, wheels straight, parked the same way in both shots. Shoot both, on the same job if the light allows it, and post them differently: the close-up earns the comments from people who work on cars, the full reveal earns the booking from people who do not.
Reflections are the background here
Every craft guide on this site tells you to freeze the background between the before and the after. Detailing is the one trade where the background is not behind the subject, it is on the subject. Paint reflects whatever is in front of it, and a mirror-flat clear coat after correction reflects it more sharply than a dull, swirled one did before you started.
The most common version of this going wrong is the detailer standing square on to the panel, phone at chest height, and ending up in their own after photo. Nobody notices at the time because the panel was too dull before to reflect much of anything. Once it is corrected, there you are, in frame, and the two photographs stop matching for a reason that has nothing to do with the work.
The fix is to pick an angle where the panel reflects something that will not move: an empty patch of sky, a plain workshop wall, an open bay ceiling. Stand at that angle for the before, note it, and stand there again for the after. A car parked outdoors under open sky is usually the easiest fix of all, because sky reflects as a flat, even tone rather than as a person, a van or whatever else happens to be standing in the bay. If the car has to stay indoors, angle the shot so the reflection falls on the workshop ceiling rather than on you or the client.
Curved painted panels make this worse than a flat surface would, because a wing or a bumper reflects a wider slice of whatever is around it than a door skin does. If the roller shutter or the bay door has moved position between the before and the after, the reflection changes even though nothing about the paint did, and a sharp-eyed viewer will read that as the pair not matching. Note the door position along with the angle, the same way you would note a standing spot for any other pair.
Interiors want Tap to Switch, on a small screen
A cleaned interior is a different photographic problem from a panel. It is close, cluttered and detailed: stitching, carpet fibre, the dash, the door cards, all changing at once rather than one clean line moving across a surface. A timed wipe does not give a viewer enough time to actually look at any of it before the reveal has already moved on.
Tap to Switch is built for exactly this. The viewer taps to flip between the before and the after at their own pace, which suits a small phone screen and a subject with a lot of detail to take in. It is one of the four comparison modes the app ships, and it is honoured fully in the still image export today, which makes it a genuinely safe choice for an interior photograph you are posting as a photo rather than a video.
The one thing to know before you plan a whole interior sequence around it: the video exporter currently derives its layout from the reveal animation rather than from the comparison mode you picked, so a Top / Bottom or Tap to Switch reveal video is not available yet. That is not a reason to avoid the mode, it is a reason to use it as a still for now and save Slider Reveal for whichever shot you actually want moving in a video.
Getting each pair to actually match
Panels and interiors are both still subjects, which is the easiest kind to match and the kind most detailers get wrong anyway, usually on distance or light rather than on the reflection problem above. Fix your standing distance from the panel and hold it for both frames. Use the 1x lens, never the wide 0.5x, because the ultrawide bends the edges of a curved panel and changes its apparent shape between the two shots. And use one light source for both frames: an overcast bay light and a bright midday reflection off the same panel will not agree with each other even though nothing about the paint changed.
None of this is specific to cars. It is the same method as every other trade page on this site, and the full version, with the five numbers worth writing down after your first shot, is in how to take matching before and after photos .
The one thing worth adding for this trade specifically: photograph the car dirty. Not rinsed, not wiped down, however it actually rolled in. A quick hose-off before the before photo removes exactly the grime and the dulled clear coat the after is supposed to answer, and the pair ends up understating a job you did properly. The before photograph is a record of the state the car arrived in, taken before a single microfibre cloth touches it.
Turning the pair into a post
Once you have a matched pair, panel or interior, the flow in the app is the same. Pick the two photographs, choose a comparison mode, Tap to Switch for an interior, Slider for a panel or a full reveal, choose how the reveal plays if it is a video, set the length, and export at the ratio the platform wants.
The free tier is worth knowing exactly rather than discovering at the export screen. Free gives you three exports a day, each behind a short ad, watermark on, 9:16 and 1:1 ratios only, Slider Reveal as the only video reveal, and no music. What is free and completely ungated is everything the method above actually needs: every comparison mode including Tap to Switch, every filter, the full sticker set, the label editor, your business name and logo on the frame, and Ghost Camera, which lines your before up on the live viewfinder if the correction runs long and the light shifts before you get to the after. That second list is the one worth leading with, because a paid tier is not what any of this depends on.
Car Metallic suits a panel close-up, since its frame reads like brushed steel against a paint reflection rather than fighting it. Car Dark is built vertical, for the full-car reveal you are posting to Reels or TikTok. Both sit in the niche category alongside the rest of the trade packs the app ships.
Where to check the pair before you post it
Before committing to a video, drag the pair through the free before and after slider on this site. It runs entirely in your browser, nothing leaves your device, and it is the fastest way to see whether a panel shot actually holds together. A pair shot from a fixed angle, with the reflection controlled, sits steady as the handle moves across it. If the reflection shifts, or the panel appears to move position, the mismatch is in the shoot, not something a template will cover up.
If a pair still looks off after that, why your before and afters look fake walks through the seven usual causes, and reflections belong on that list even though the guide was not written with paint in mind.
Two pairs, shot the same job
A correction job gives you a close-up that proves the work and a full reveal that sells the next one, and they are worth the extra thirty seconds it takes to shoot both properly rather than cropping one photograph two ways. Watch the reflection, dry the panel of nothing but dust before the before, and pick the angle before the wand or the polisher comes out, because like every other trade on this site, there is no reshooting a before once the job has started.
For the caption and hashtag rotation the detailing community actually uses, the auto detailing hashtag page has the current pool for Instagram and TikTok. The federal wage numbers behind the trade are on the car detailers data page, if you want the counts rather than the vibe. And if you have not shot a pair on the app yet, the app is the free download the rest of this page assumes.
Common questions
- What is the difference between a panel close-up and a full-car reveal in detailing content?
- The panel close-up is a tight shot of one section, a bonnet, a door, a wheel arch, taken to prove correction actually happened to the paint itself. The full-car reveal is a wider shot of the whole vehicle, taken to sell the booking to someone scrolling past who has never seen your work. They answer different questions for different viewers, so shoot both and post them separately rather than trying to make one photograph do both jobs.
- Why do my before and after car photos show my own reflection?
- Because the background of a detailing photograph is the paint itself, and paint reflects whatever is in front of it. If you are standing square on to a panel with the phone at chest height, you are very often in the shot. Move to an angle where the panel reflects sky, a wall or the workshop ceiling instead of you, and keep that same angle for both the before and the after.
- Which comparison mode works best for a car interior?
- Tap to Switch, on a small screen. An interior is a cluttered, detailed subject and a timed wipe moves on before a viewer has actually looked at the stitching or the carpet. Tap to Switch lets them control the pace themselves. It is honoured fully in the app's still image export today, so it is a safe choice for an interior photograph even before it reaches a full reveal video.
- Can I export a Top / Bottom or Tap to Switch reveal video for a car?
- Not yet. The video exporter currently derives its layout from the reveal animation you choose rather than from the comparison mode itself, so Top / Bottom and Tap to Switch are image-export choices for now. Slider Reveal is the one reveal that plays correctly in a video today, which is exactly the mode a straight paint correction line suits anyway.
- Should the before photo be taken dirty, or after a quick rinse?
- As dirty and as unwashed as the car actually arrived. A quick rinse before the before photo removes exactly the swirl marks, the grime and the dullness that the after is meant to answer, and the pair ends up understating the job. Photograph the car in the state it was dropped off in, before a single wipe of a microfibre cloth touches it.
- How do I check whether a detailing before and after actually matches?
- Run both photographs through the free before and after slider on this site. It works entirely in your browser, nothing uploads anywhere, and you drag the handle across the pair the way a viewer would. A panel shot from the same angle and distance holds steady as the handle moves. If the reflection, the crop or the light jumps between the two frames, the mismatch is in the shoot, not something a template will hide.