Landscaping and Lawn Care Before and After Videos, Shot to Actually Match
A garden will not hold still for you the way a driveway does. Here is the fixed mark to use instead of the plants, and why the whole plot usually needs to be a smaller shot than you think.
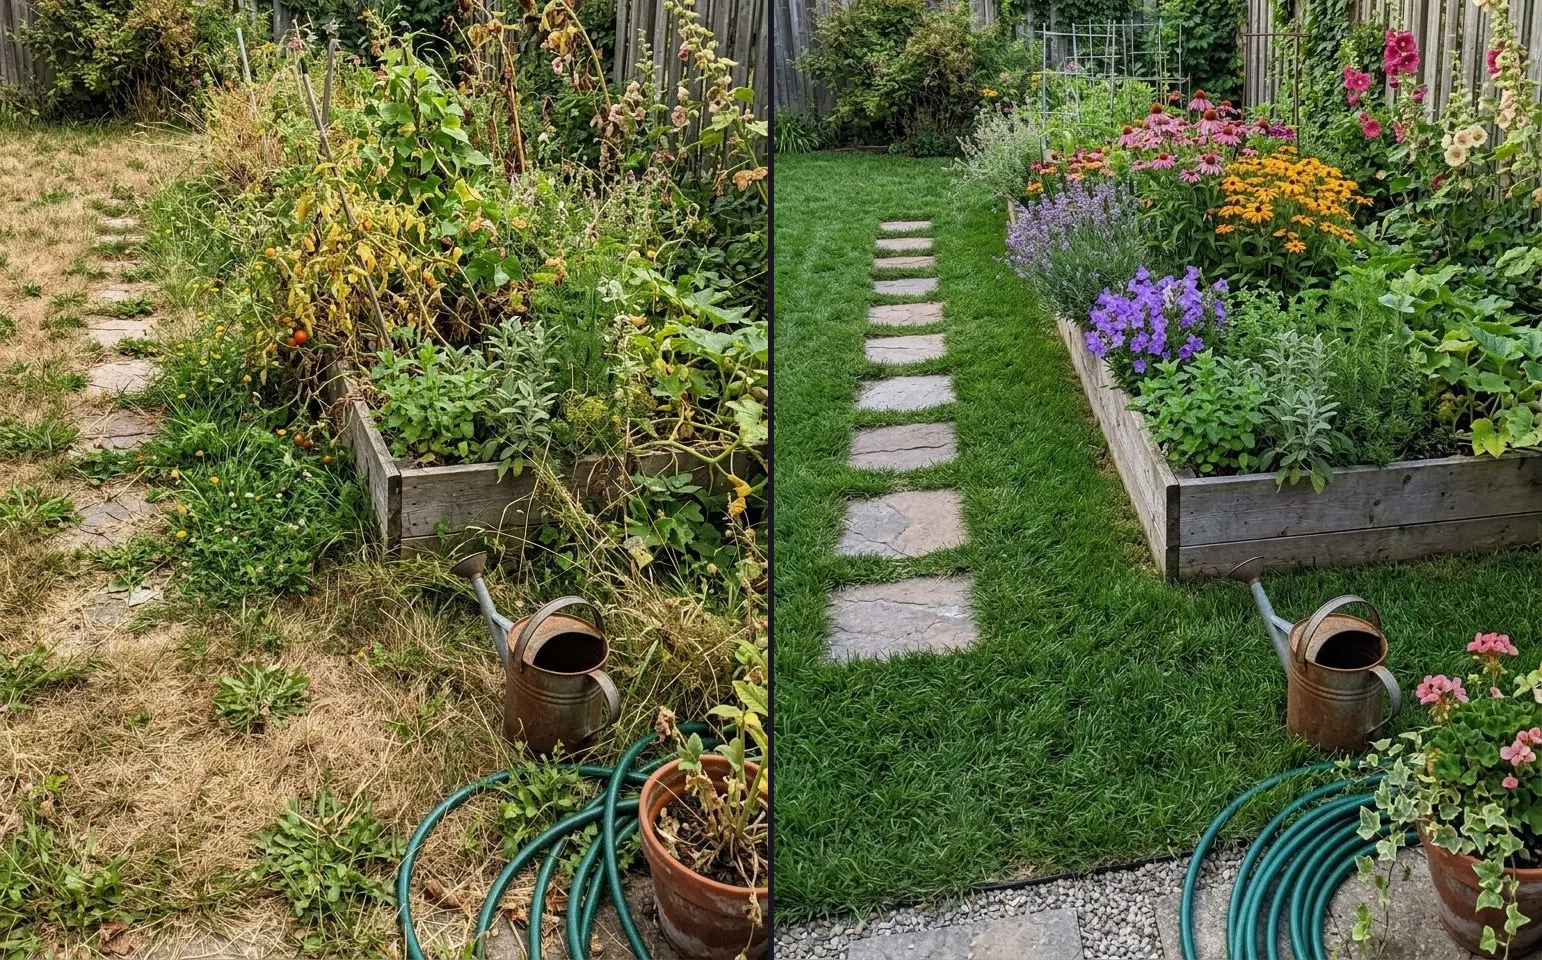
A lawn takes two hours to mow, edge and clear, and by the time you are done the truck is loaded and the light has moved. If the before photo did not happen at the start, it does not happen at all, because there is no going back to reshoot weeds you already pulled out.
Landscaping is one of the best-looking trades on this site and one of the hardest to shoot cleanly, for a reason nobody else on this site has to deal with: the thing that makes the after impressive is also the thing that cannot be your reference point.
The fixed mark is something built, never something growing
Every guide on matching a before and after comes back to the same idea: find something in the frame that cannot move, and line your camera up against it. Indoors that is a doorframe or a skirting line. Outdoors, on a job like this, the obvious candidates are wrong.
A tree is not a fixed mark. Neither is a hedge, a flower bed or a patch of lawn, because those are exactly what the job changes. If you try to line your after up against the shrub in the corner, you are lining it up against something that may have been removed, trimmed to half its size or replanted entirely. There is nothing stable left to anchor to.
Use something built instead. A fence post. The corner of the house. A kerb, a downpipe, a manhole cover, a paving line, a garden tap. These do not care what happened to the lawn between your two visits, and they give you the same three numbers every matching guide relies on: the same standing distance, the same camera height, the same angle. Pick your built anchor on arrival, before you touch anything, and use it again when the job is done.
Time of day beats weather
Outdoor light punishes a mismatched pair harder than almost anything indoors, and the instinct most people have about it is backwards. They wait for two sunny days to line up and shoot at whatever hour suits the schedule. What actually matters is the clock, not the sky.
Cloud cover changes how soft the light is, but the sun’s position changes where every shadow in the frame falls and which side of the garden is lit at all. Two overcast photos shot at noon, a week apart, will resemble each other far more closely than two sunny photos shot five hours apart on the same day, because in the second case the sun has physically moved across the sky and taken the whole shadow structure of the garden with it. An overcast midday is not a compromise. It is close to the easiest lighting condition this trade gets.
So if the before was shot at nine in the morning, come back at nine in the morning. Grey and consistent beats bright and mistimed, every time.
Wide plots want Top and Bottom, and the whole garden is usually the wrong shot
A garden, a driveway, a whole lawn: these are wide subjects, much wider than they are tall, and most of this trade’s content ends up in a vertical frame because that is where Reels, TikTok and Stories live. Squeeze a wide plot into the left or right half of a 9:16 frame with Side by Side and you lose most of the width that actually changed. Squeeze it into a single vertical frame with Slider and you are looking at a narrow strip of garden that could be almost anything.
Top and Bottom solves it for a still image, stacking the full width of the before over the full width of the after instead of splitting the frame down the middle. For a wide plot, that is the comparison mode to reach for, and the app’s image export honours all four comparison modes today, so this is a genuinely safe choice for a photo you post to a profile, a quote or a local group.
Video is the one place this needs a caveat. The video exporter currently takes its layout from the reveal animation you choose rather than from the comparison mode, so a Top and Bottom or Tap to Switch video is not available yet. Slider Reveal is what actually exports as a moving reveal today, and if you want video rather than a still, that is the mode to build around, even on a wide subject.
There is also a shot decision underneath the mode decision, and it matters more than either. A whole garden crammed into one frame after the job is finished often reads as a smaller change than it is, because the parts that did not need doing dilute the parts that did. A single bed, properly edged and planted, usually sells the work harder than the same garden shot wide. Shoot the bed that moved the needle as your main pair, and treat the wide shot of the whole plot as a second, supporting photo rather than the hero image.
What to shoot before the mower starts
The before photo for this trade happens in a narrower window than almost any other on this site, because a garden clearance is genuinely irreversible. Once the overgrowth is cut back, the weeds are pulled and the beds are turned over, there is no photographing what was there an hour ago.
Take it on arrival, from the spot you have picked against your built anchor, before a single tool comes out. If the job runs long enough that the light changes noticeably by the time you are shooting the after, our app’s Ghost Camera is the free feature built for exactly that gap: it overlays the before photograph on your live viewfinder at an opacity you set yourself, so you can line the fence post or the kerb back up before you press the shutter on the after. It does not fix a different lens or a different standing distance, only alignment, but alignment is usually the whole problem on a job that ran three hours longer than planned.
Turning the pair into a post
Once you have a matched before and after, the flow is the same one every trade on this site uses. Pick the two photographs, choose a comparison mode, choose how the reveal plays, set how long the video runs, and export at the ratio wherever you are posting actually wants: 9:16 for a Reel or a Story, 1:1 for a grid.
The free tier is honest about what it holds back. Free gives you three exports a day, each behind a short ad, with a watermark on, 9:16 and 1:1 only, Slider Reveal as the only video reveal, and no music. What is free and completely ungated is everything you need to actually shoot and build the job properly: every comparison mode including Top and Bottom, every filter, the full sticker set, the label editor, your business name and logo on the frame, saved projects, and Ghost Camera. None of that sits behind the paywall.
For the look itself, the app ships a four-template garden pack built for this trade. Garden Fresh and Garden Minimal both suit a clean, plant-forward reveal where the bed itself is the whole story. Garden Pro carries a darker, brand-forward frame if the post needs your business name to read at a glance rather than sit quietly in a corner. All four sit together in the niche category alongside the packs built for the site’s other trades.
Check the pair before you commit to a video
Before you build a full video around a pair, it is worth checking that the two frames actually hold together. The free before and after slider runs entirely in your browser: drop in your two photographs, drag the handle, and nothing leaves your device. If the fence post or the kerb jumps as the handle passes over it, the mismatch is in the shoot, not something a template will paper over, and it is far cheaper to find that out before you have built the whole post.
The season this trade actually has
Demand for this kind of content lifts hardest from March through May, when a garden left alone over winter turns into a spring clean-up, and that seasonal overgrowth is genuinely the easiest before you will ever get. A garden nobody has touched for months gives you the starkest possible starting point, and the built anchor you picked on the first visit is exactly what lets you come back to it, whether that is the next afternoon or six weeks later once the beds have filled in. If the gap between your before and after runs to weeks rather than hours, the same-angle guide covers the parts of this that are specific to a longer wait: what to write down on the first visit, and how to use that photo itself as your measuring tool when you come back.
Between a fixed anchor, the right time of day and a mode that respects how wide the job actually is, this is a trade that photographs well once you stop treating the plants as the reference point. Post the bed that changed, save the whole garden for a supporting shot, and the pair will do the job the mower already did.
If you post regularly, the landscaping hashtag and caption page has the current rotation split between Instagram’s renovation language and TikTok’s rescue and satisfying tags, and the landscaping companies data has the federal counts behind the trade if a number is more useful to you than a caption. And if this is the first job you are shooting on a phone rather than reaching for an editor afterwards, the app is the free download the rest of this page assumes.
Common questions
- What should I use as the fixed reference point for a landscaping before and after?
- Something built, not something growing. A fence post, the corner of the house, a kerb, a downpipe or a manhole cover all stay exactly where they are between the before and the after. A tree, a hedge or a garden bed is the subject of the job, which means it is exactly what changes, so it cannot also be the thing you line the two photos up against.
- Does the weather need to match for an outdoor before and after?
- Less than the time of day does. Cloud cover changes how soft the light is, but the clock changes where every shadow falls and which side of the garden is lit. Two overcast photos taken at noon, a week apart, will match each other far better than two sunny photos taken five hours apart on the same day, because the sun has moved and taken the whole shadow pattern with it.
- Should I photograph the whole garden or just the bed that changed?
- Usually the bed. A whole garden squeezed into one frame often reads worse after the job than a single bed shot properly, because the parts that did not change dilute the parts that did. Shoot the section that actually moved the needle, and use the wide shot as a second, supporting photo rather than the main pair.
- What comparison mode suits a wide plot like a driveway or a whole lawn?
- Top and Bottom, for a still image. A wide plot is much wider than it is tall, and splitting it left and right with Side by Side, or a vertical frame with Slider, throws away most of the width that actually changed. Stacking the before over the after keeps the whole plot visible in both frames, and the app's image export honours all four comparison modes today.
- Can I turn a landscaping reveal into a video with Top and Bottom?
- Not yet. The video exporter currently derives its layout from the reveal animation rather than the comparison mode you picked, so a Top and Bottom or Tap to Switch video is not available until that ships. Slider Reveal is the mode that works in video today, and it is a reasonable substitute for a wide plot if you are willing to trade some width for a mode that actually exports as a moving reveal.
- When is the best time of year to shoot landscaping before and afters?
- Whenever the job happens, but the trade's own demand for this content lifts from March through May, when overgrown winter gardens turn into spring clean-ups. That is also the easiest season to get a dramatic before, since a garden left alone over winter gives you the starkest possible starting point.