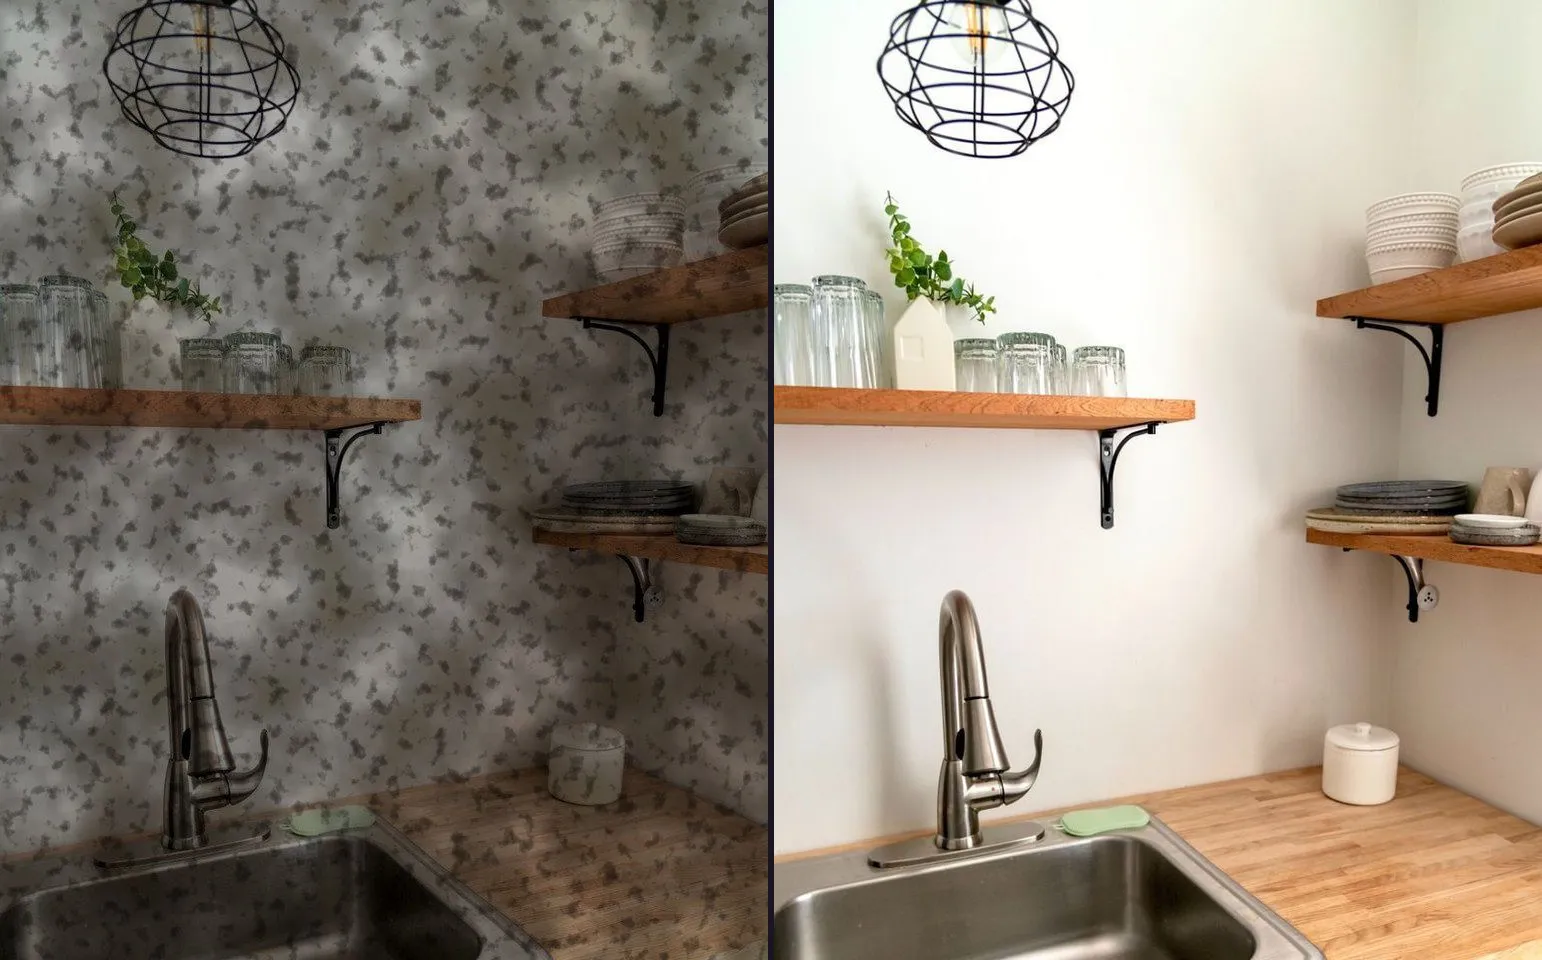
Real Estate Before and After Videos (Not Virtual Staging)
A listing before and after is two real photographs of the same room, not a rendering. How to pick the room, handle two shoots that never met each other, and brand the reel to the agency rather than the app.
An agent finds two photographs from the same listing folder: one from three years ago, when the kitchen was the reason the house had sat on the market for four months, and one from last week, after the vendor finally renovated it before relisting. Nobody shot these as a pair. They were both just listing photographs, taken by whoever had the job at the time, filed under the same address and forgotten about until someone noticed what they had.
That is the normal starting point for this trade, and it is worth saying up front what this page is not. It is not virtual staging. Virtual staging generates furniture, paint and finishes inside a photograph of a room that was never actually renovated, which is a different product built for a different problem: an empty listing that needs to look lived in before a buyer walks through. What this page covers is the opposite situation, two real photographs of a room that genuinely changed, turned into a reveal rather than left as two separate images in a gallery nobody clicks through in order.
And because the app behind this site takes photographs, not footage, say the other thing early too: this is two still images in, one video, GIF or image out. There is no clip of the old kitchen and no clip of the new one. If you were hoping to cut together a walkthrough video from before the reno and a walkthrough from after, that is a different kind of editing than anything here.
Pick the room that changed the most, not the one that photographs best
Every listing has a room that would win a straight beauty contest against every other room in the file, usually the one with the best natural light or the nicest styling on the day. That is not automatically the room for this. The room you want is the one where a buyer, scrolling a Reel at speed, would actually stop.
That is almost always the room where the renovation happened, even when the photograph of it is a little more ordinary than the rest of the set. A kitchen that went from tired laminate and a single pendant light to stone benchtops and proper task lighting is doing real work for the listing, whether or not the after photograph is the sharpest image in the folder. A bathroom that was regrouted and had a new vanity fitted tells a smaller, cleaner story than a kitchen or a living space that was properly gutted. Choose by the size of the change, not by which frame you would frame and put on a wall.
If more than one room genuinely changed, that is a series, not a single post. Pick the strongest one for the first reel and hold the rest back for the next listing update rather than trying to force three rooms into one comparison, which usually ends up as three weak pairs instead of one strong one.
When the before and after never met each other
Most of the guides on this site assume you are planning the before shot with the after already in mind, standing on a marked spot, at a fixed height, under one light. Real estate rarely works that way. The before photograph exists because a photographer needed a listing image for a house that has since sold or been relisted. The after exists because a different job, months or years later, needed the same thing. Nobody involved in either shoot was thinking about a comparison.
That is fine, within limits. What actually breaks a pair is set out in full in why your before and afters look fake, and two of those seven causes turn up constantly in real estate photography specifically. The first is the lens: real estate photographers reach for a wide-angle lens because it is the only way to get a small room to read as spacious in a listing photo, and if the before was shot on a standard lens while the after was shot ultra-wide, every straight line in the room, the skirting board, the cabinet edge, the ceiling line, bends differently between the two frames. The second is framing distance and angle: a photograph taken square-on from the doorway sits next to one taken from a corner, and the room looks like two different rooms because, in terms of where the camera stood, it effectively was.
Neither of those is something you can fix after the fact. What you can do is choose the pair with judgement: if you have several photographs of the same room from each shoot, pick the two that are closest in angle and lens before you pick the two that are individually the nicest images. A slightly less flattering photograph that actually matches its pair will hold together in a reveal. A beautiful one that does not match will jump the moment a slider or a wipe passes over it, and a buyer notices that even if they could not tell you why.
Choosing the mode for the room’s shape
Once you have the pair, the comparison mode is a decision about the room’s shape rather than a style choice. A kitchen or living space shot wide, which most real estate photography is, usually reads better in Top / Bottom than in Slider or Side by Side, because stacking the full width of both frames keeps the detail at the edges of the room rather than squeezing it into half a vertical frame. A narrower shot, a hallway, a single vanity, a feature wall, suits Slider or Side by Side instead, since there is less width being thrown away.
One export limit applies here and it is worth knowing before you build the post rather than after: the video exporter currently takes its layout from the reveal animation rather than from the comparison mode, so a Top / Bottom video is not available yet, only a Top / Bottom still image. For a wide room going out as a Reel, that usually means Slider Reveal is the practical choice for the moving version, with Top / Bottom kept for a still post to the grid or the listing gallery. Which comparison mode to use goes through all four modes and this export caveat in more depth if you are choosing between them for the first time.
Branding matters more here than in almost any other trade on this site
In most of the trades this site covers, the pair itself is the pitch. In real estate, the pair is doing marketing for a property that is not yours to sell twice, and the only thing that turns a striking renovation reveal into a lead for your agency is whose name is on the frame when it gets shared.
Your business name and logo are free to add and completely ungated on every plan, and they stay attached to the export, on every ratio and every template. That matters more here than it does for a driveway or a haircut, because a listing reel is exactly the kind of content that gets reshared, saved and screenshotted by people who are not your client, and a reel with no agency mark on it has done someone else’s marketing for them at no cost to that person. Put the mark on every listing reel you build, in the same position each time, so a scroll through your feed reads as one agency’s work rather than a series of unrelated posts.
Exporting for where a listing actually gets seen
The ratio is a question about the destination, not the room. A Reel or a Story wants 9:16. A single feed post wants 4:5. A grid post or a listing thumbnail wants 1:1. None of the room-shape decisions above change that, they only decide which comparison mode fits inside whichever ratio you have already chosen.
The free tier is worth knowing exactly, because this is a trade where an agency posting several listings a day will feel its ceiling faster than most. Free and completely ungated: every comparison mode, every filter, the full sticker set, the label editor, and your business name and logo on the frame. What is limited is the export itself: three a day, each behind a short rewarded ad, a watermark on the file, 9:16 and 1:1 ratios only, and Slider Reveal as the only video reveal, with no background music. An agent posting one strong renovation reveal a week will rarely notice that ceiling. An agency running several listings through it in a day will want more exports than the free tier gives.
The look for a listing
Real Estate is the app’s dedicated template for this trade, built with a gold divider and a “Before Reno” and “Transformed” label pair rather than the generic Before and After wording most templates use. If you want something plainer and closer to a brokerage’s own visual identity, Estate Clean is a white, minimal frame with your branding band along the bottom, and Estate Luxury carries a dark, serif-labelled look built for a higher-end listing. All three, along with the rest of the real estate pack, sit inside the brand template category, worth a look if none of the three above is quite the register your agency wants.
Check the pair before it goes into the listing
Before a reveal goes out under your agency’s name, it is worth checking that the two frames actually hold together as a comparison. The free before and after slider on this site runs entirely in your browser: drop in the before and after listing photographs, drag the handle, and nothing leaves your device. If a doorframe or a benchtop edge jumps as the handle crosses it, the mismatch is in the two original photographs rather than anything you can fix in the app, and it is worth knowing that before the reel is built rather than after it has already gone out to a list of buyers.
The two photographs you probably already have
Most trades on this site have to be told to plan the before shot months in advance. Real estate is unusual in that the photographs frequently already exist, filed under the same address, taken for a purpose that had nothing to do with a reveal. The job here is choosing the pair with judgement rather than shooting one from scratch: the room that changed the most, the two frames that are closest in lens and angle even if neither is the prettiest image in the folder, and a mode that suits the room’s shape rather than whichever one looks good in someone else’s post.
Do that, put the agency’s name on it, and export it at the size the platform wants. If this is the first listing you are turning into a reveal rather than leaving as two photographs in a gallery, the app is the free download the rest of this page assumes, and how to take matching before and after photos is worth reading before your next listing, for the renovations you get to plan the before shot for rather than inherit from someone else’s camera.
Common questions
- Is a real estate before and after video the same thing as virtual staging?
- No, and it is worth saying plainly because the two get searched together. Virtual staging generates furniture and finishes inside a photograph that was never actually there. A before and after listing video uses two real photographs of the same room, taken at two real points in time, usually before a renovation or a styling pass and again once it is finished. Nothing in either frame is generated. If you are looking for software that furnishes an empty room digitally, this app is not that, and this page is not about that.
- Which room should I use for a real estate before and after?
- Whichever room changed the most, not whichever one happened to get the best light on shoot day. A kitchen that went from dated laminate to a full renovation carries a listing further than a bedroom that was only repainted, even if the bedroom photograph is technically the nicer of the two. Pick the room a buyer would stop scrolling to look at twice.
- Do the before and after listing photos need to have been shot the same way?
- Ideally yes, and in practice they often were not, because real estate photographs are usually taken by whichever photographer or agent had the listing at the time, sometimes years apart. If both frames are reasonably square-on to the room and neither is cropped tightly, the pair will still work. What breaks it is a wide-angle lens in one frame and a standard lens in the other, since that changes the apparent shape of the room rather than just its lighting.
- Can I put my brokerage's logo on a before and after video?
- Yes, and this is one trade on this site where it matters more than the reveal itself. Your business name and logo are free to add on every plan, they stay on the frame through export, and they carry across every listing you build afterwards. A reel that shows a beautiful renovation with no agency name on it has done someone else's marketing for them.
- What export ratio suits a real estate listing?
- 9:16 for a Reel or Story, 1:1 for a grid post, and 4:5 if the listing is going into a single feed post rather than a Reel. None of that is about the room, it is about where the post is going to be seen, so decide the destination before you decide the ratio.
- What's the honest free tier for an agent posting these regularly?
- Generous about building the reel and strict about exporting a lot of them. Free and completely ungated: every comparison mode, every filter, the full sticker set, the label editor, and your business name and logo on the frame. What is limited: three exports a day, each behind a short rewarded ad, a watermark on the file, 9:16 and 1:1 ratios only, and Slider Reveal as the only video reveal. An agent posting one listing a week will rarely notice the ceiling. An agency posting several a day will.