How to Shoot a Window Cleaning Before and After (When the Job Itself Is Invisible)
Clean glass has no texture to photograph, so a window cleaning before and after has to prove itself through what is visible behind the pane, not the pane. Here is the shot that works and the two things that ruin it.
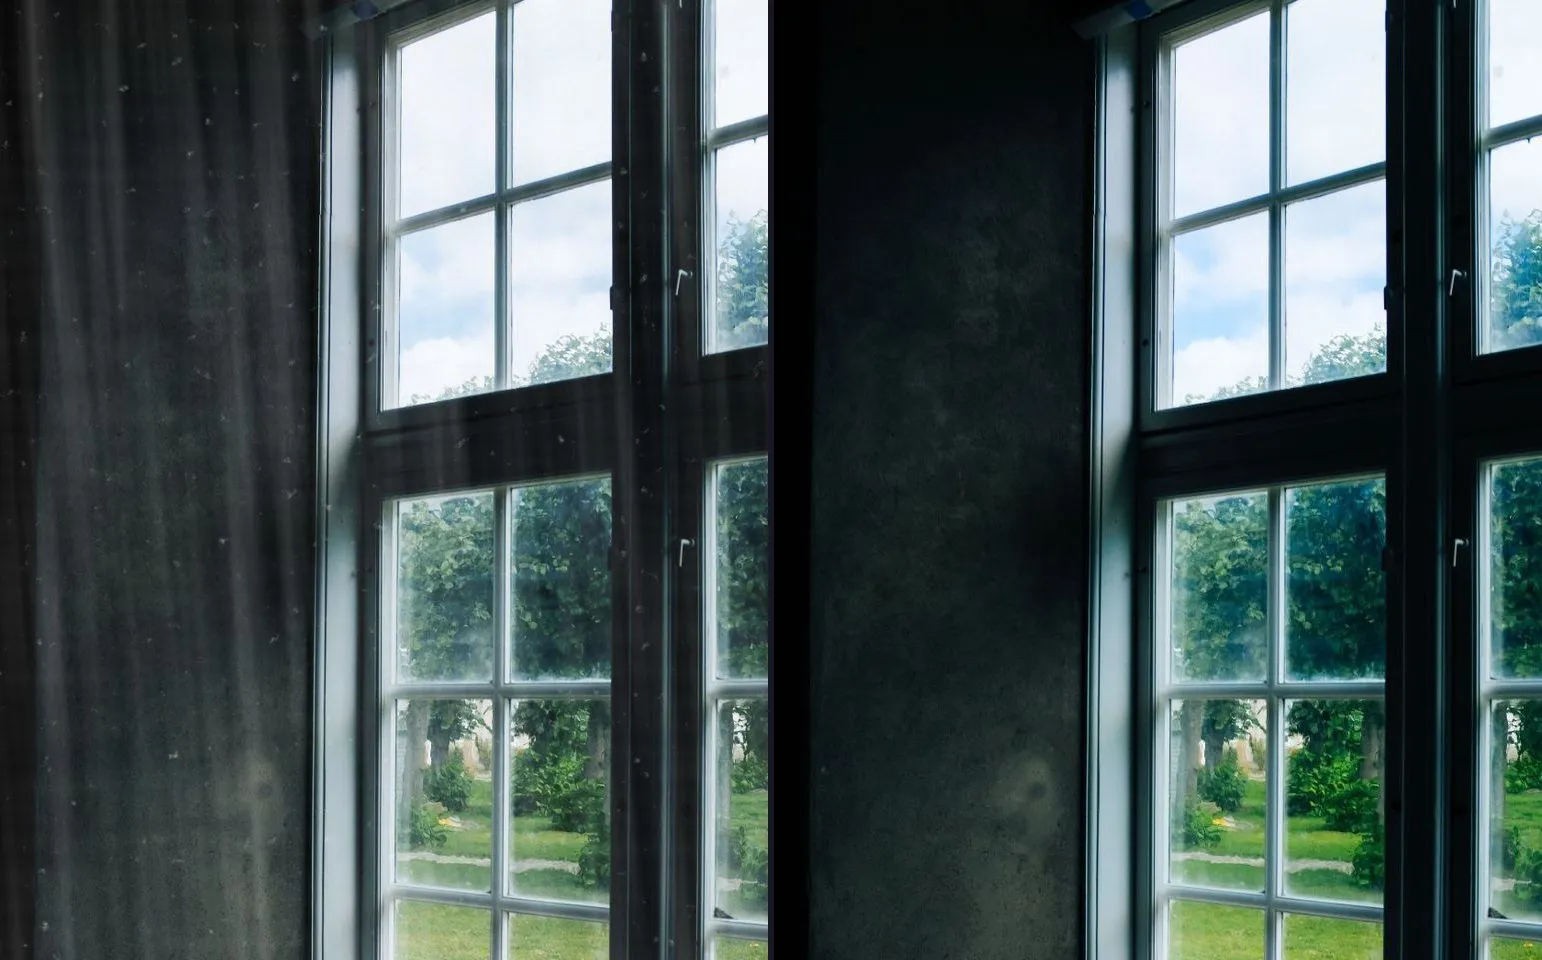
Point a camera at a clean window and you have photographed nothing. There is no texture change to register, no colour shift, no obvious before-and-after difference the way a dirty driveway going pale or a stained carpet coming back to colour gives you one for free. Glass either lets light through or it does not, and clean glass, photographed on its own, looks exactly like no glass at all.
That is the problem this trade has that almost nothing else on this site has: the job’s actual output is invisible, and the pair has to prove a negative. The good news is that the fix is the same shape as every other craft problem here, it just points at a different subject.
The subject is what is behind the glass, not the glass itself
A clean pane does one thing a dirty pane cannot: it gets out of the way. Haze, hard water spots and streaking scatter light before it reaches your eye, which flattens and dulls whatever is on the other side. Clean glass lets that same light straight through, so the lawn, the street, the room beyond it comes back into full contrast and colour.
That is what you are photographing. Frame the shot so there is something worth seeing through the pane, a garden, a room’s furniture, a shopfront display, and shoot the before and the after through exactly that same view. A before photographed through a hazed window shows a muted, low-contrast version of whatever is out there. The after, through the same clean pane, shows the same scene sharp and saturated. The viewer’s eye does the rest, because the improvement they are actually reading is happening one layer back from where they think they are looking.
This is also why a window pair fails when it is framed too tight on the glass itself. A close crop on the pane with nothing recognisable behind it just shows two rectangles of slightly different clarity, which nobody can judge without the other photo directly in front of them. Pull back enough that the view through the glass is doing the work.
The half pane split, the same trick as a driveway
If you have read this site’s page on pressure washing, you already know this move. Work a pane in two passes instead of one continuous wipe. Stop halfway across it, step back, and photograph the whole pane in a single frame: hazed on one side, streak-free on the other, the line between them running straight down the middle.
That one photograph is already a matched pair, because both halves were shot in the same instant, from the same distance, under the same light, through the same view. Nothing could have drifted between them, since there was only one shutter press. Open it in your phone’s own editor afterwards, crop it into a left half and a right half, and you have a before and an after ready to feed into the app as a normal photo pair, the same way you would two shots taken minutes apart. The app takes two still photographs in and hands you back a video, a GIF or a single image. It does not take video clips, and a half pane split is exactly the kind of pair it is built for.
It works better here than a driveway does, if anything, because glass has no independent texture to distract from the split. The line is purely about what you can see through each half, which is the cleanest possible version of the trick.
Reflections and sun angle are the real enemy, not weather
Every other outdoor trade on this site worries about the light changing between two frames. This one has a second problem stacked on top of that: the glass itself reflects, and what it reflects moves with the sun.
Point a camera at a pane on a bright day and you are as likely to photograph the sky, a tree, a parked van or your own silhouette as you are to photograph what is actually behind the glass. That reflection shifts the moment the sun moves, which it does continuously through a working day, so a before shot at nine and an after shot at eleven can carry two completely different reflections layered over two completely different levels of haze. A viewer cannot separate “the glass got cleaner” from “the reflection changed”, and the pair reads as manipulated even when nothing about it was.
An overcast day removes almost all of this at once. Diffuse cloud cover means there is no single hard light source for the glass to bounce back at the camera, so the pane stays readable as glass rather than turning into an intermittent mirror. Where the trade’s other craft guides on this site treat an overcast sky as a consolation prize, this is the one job where it is a genuine advantage. If you can choose your shooting time, choose the flattest light of the day, not the brightest.
Where you stand relative to the sun matters as much as the sky does. Keep the sun behind you or off to one side rather than behind the glass, and keep both frames on that same side of the building so neither photograph is fighting a different angle of light than the other.
Deciding which side of the glass to shoot from
Residential work and storefront work want different answers here, and it is worth deciding on purpose rather than by habit.
For a house window, shoot from outside. The view coming back into focus, a garden, a street, the far side of the room, is what a homeowner recognises as the actual improvement, and outside is also where the light is easiest to control. For a shopfront or a storefront window, the more convincing pair is often shot from the street looking in, because the audience for that photograph is a passer-by deciding whether the shop looks cared for, and what they judge is what they themselves would see walking past. Either answer is fine. The mistake is switching sides between the before and the after, which changes the reflections, the depth of field and often the exposure all at once, on top of whatever the cleaning actually changed.
If the light shifts enough between your before and your after that lining the second shot up gets difficult, particularly on a job that runs long enough for the sun to move round a building, Ghost Camera is the free feature built for exactly that gap. It overlays your before photograph on the live viewfinder at an opacity you set yourself, so you can match the frame before you press the shutter rather than discovering the mismatch afterwards. How to use Ghost Camera covers the opacity that works for an outdoor subject like a window front.
Turning the pair into a post
Once you have a matched pair, half pane or two full shots, the flow is the same one every trade on this site uses. Pick the two photographs, choose a comparison mode, choose how the reveal plays if you are exporting a video, set the length, and export at the ratio the platform wants.
Slider suits a single pane well, because the streak line you already shot runs down the middle of the frame, and a slider reveal echoes the same motion as the pass you made with the squeegee. It is also the one reveal that plays correctly in a video today. A storefront or a row of windows is a different shape, wider than it is tall, and Top and Bottom keeps the full width visible in both frames rather than squeezing it into a narrow vertical strip, though for now that is a choice for the still image export rather than the video, since the video exporter derives its layout from the reveal animation.
The free tier is worth stating plainly rather than finding out at the export screen. Free gives you three exports a day, each behind a short ad, with a watermark on, the two most common ratios, 9:16 and 1:1, Slider Reveal as the only video reveal, and no music. What is free and completely ungated is everything the shooting method above actually needs: every comparison mode including Top and Bottom, every filter, the full sticker set, the label editor, your business name and logo on the frame, and Ghost Camera. That second list is the one worth leading with, since nothing above depends on paying for anything.
Pure White suits a window pair particularly well, because a plain, bright frame does not compete with a photograph that is already mostly about clarity and light. Teal Strike is the better choice for a storefront reveal you want to stop a scroll, in the same way it suits a punchy exterior on the pressure washing trade. Both sit in their own categories, clean and bold, if you want to see the rest of each pack.
Where to check the pair before you post it
Before committing to a video, run the pair through the free before and after slider on this site. It works entirely in your browser, nothing leaves your device, and it is the fastest way to see whether a window pair actually holds together. A half pane split, cropped from one photograph, sits rock steady as the handle moves, because there was nothing to misalign in the first place. If a full before-and-after pair jumps or the reflection lurches as the handle drags across it, the mismatch is in the shoot, not something a template will fix. The full list of what usually causes that is in why your before and afters look fake , and most of it applies to glass exactly as written.
Prove the job by proving the view
A window cleaning before and after is never really a photograph of a window. It is a photograph of whatever the window was hiding, brought back into focus, and the whole method above is really one instruction said five different ways: keep the reflection out of it, keep the view in it, and keep the light flat enough that the glass stays glass in both frames instead of turning into a mirror in one and a window in the other.
Do that, and the pair proves itself the moment someone looks at it, the same way clean glass proves itself the moment someone looks through it. For the caption and hashtag rotation the trade actually uses, the window cleaning hashtag page has the current pool for Instagram and TikTok. And if you have not shot a pair on the app yet, the app is the free download the rest of this page assumes.
Common questions
- Why is a window cleaning before and after harder to shoot than most trades?
- Because the actual product of the job, clean glass, is not a texture a camera can register on its own. A pane photographs as whatever is on the other side of it or reflected in front of it. Every other trade on this site changes a surface you can point a lens at directly. This one changes something you can only prove by showing what the glass now lets through or keeps out.
- What is the half pane split shot?
- Work one pane in two passes rather than one, stop halfway across it, and photograph the whole pane in a single frame: hazed on one side, clear on the other, the streak line running down the middle. Because it is one photograph, the light, the angle and the distance are identical on both halves, so you can crop it into a matched before and after afterwards with nothing left to argue about.
- Should I shoot from inside or outside the glass?
- Outside, most of the time, because it lets the pair show the view coming back into focus, which is the part a viewer actually understands as clean. Shooting from inside works for a storefront or a shopfront window where the point is what a customer on the street can now see in, but decide which side tells the story before you shoot either frame, and keep both photographs on that same side.
- Why does an overcast day help this trade specifically?
- Because reflection is the enemy of a glass photograph, not the friend. Direct sun on a pane throws a hard reflection of the sky, a tree or your own van across exactly the surface you are trying to prove is clean, and that reflection moves every time the sun does. Even, diffuse light under cloud cover keeps the glass readable as glass in both frames instead of turning it into a mirror.
- Which comparison mode suits a window pair?
- Slider for a single pane, since the streak line you shot already runs down the middle of the frame and a slider reveal echoes it directly. Top and Bottom suits a storefront or a row of windows, because a shopfront is wider than it is tall and stacking keeps the full width in both frames. Both are safe for the still image export, and Slider is the one that also plays correctly in a video today.